Showing posts with label needle felting tutorial. Show all posts

Wednesday, 9 January 2019

Creating Fleece Curls for Needle felting

Felted poodle dogHave you seen the lovely curls you can buy and drooled over them - only to buy them and been a little disappointed by the quality


Or you have wanted locks to match a perfect colour for your needle felting project


That was me - until I found several methods to create my own curls using my own roving or tops in every single colour


 Here in my very first video on curls I showed my method that I found and have loved of winding a thin strand of tops around a kebab stick (or a chopstick if you want looser curls, and then tipping a kettle of boiling water over the fleece to 'shock' it into taking the shape

I then discovered how to make sure they work every single time by making sure to add a little twist as you wind your tops rather than making it totally flat like a ribbon

(this video is really worth watching)

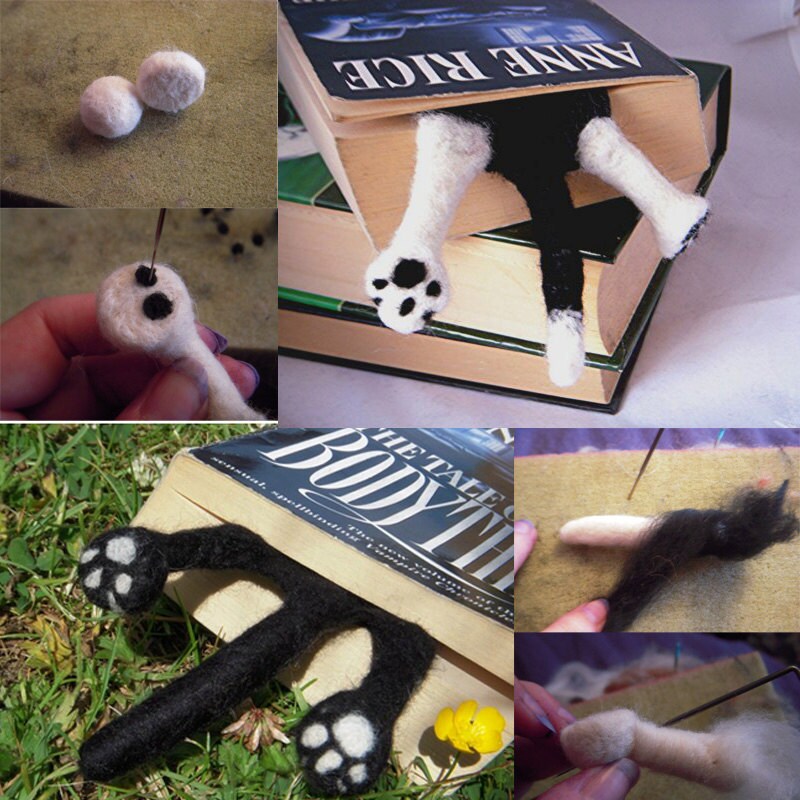
And finally how do you use these curls? or how to quickly make some when you dont have time to create some and wait for them to dry? You can just use roving and felt it on 'curly' to make bobbles and lumps of a short curly coat (if you want flowing locks like a unicorn mane or a mermaid hair (am I giving you ideas for projects?) then you do need to create the locks first)

I hope these little tutorials help and inspire you with ideas for new projects - and save you money :) 
If you make anything with 'my' locks please share them with me #BenMcFuzzylugs or come over to 'Pam Duthies Felting Friends' on facebook 

Oh and I am asked often how long these curls last - I have had some for several years and have seen no signs of the curls dropping - they seem pretty permanent 

Thursday, 30 March 2017

How to needle felt. Needle felting Easter bunny tutorial

Todays needle felting tutorial video we have a fab project for beginners - the needle felted Easter bunny

This wee guy is so simple, just 2 basic shapes, takes about an hour or less and is super cute 


If you are a total beginner I would recommend checking out some of my basics videos before getting started 

An introduction to the equipment


How to felt a ball

Bunny ears


I have been asked a few times if I sell felting supplies - I dont - but click my affiliate link for Amazon below and it takes you to some people who do sell felting supplies and look pretty good :) 


Thursday, 9 March 2017

How to needle Felt, a miniature schnauzer full needle felting tutorial


Whew, I have finally done it
A full needle felting tutorial of this cute tiny miniature schnauzer

Felt along with me in this step by step needle felting tutorial - over one hour of free tutorial to help you create your own first project  Please feel free to share if you create a little dog of your own


Thursday, 23 February 2017

Needle felting Basics. How to add Jump hoops to turn your felt shapes into beads - and vote for the animal you would like me to show a tutorial of

In todays video I show you how you can take your needle felted paws, hearts and balls and add a jump hoop to let you turn them into super light beads


Also I introduce to to my moon gazing hare and white rabbit 
Please vote on the animal you would like me to create a full length tutorial on. You can vote for any animal on any video.

Please stay tuned for more beginner needle felting tutorials and to meet some more of my animals

Thank you :) 


Friday, 27 January 2017

Starting out needle felting, Needle felted Penguin Tutorial

I am actually really enjoying learning about vidoe editing, I know I have a long way to go
But this week I learnt how to remove the hum from my camera and I learnt how to do photo in photo

Which ment doubling up (well treabling because I messed up and felted out of shot for the 1st close up! Doh) my filming but I HOPE it gives a clearer tuotirial where you can actually see what I am doing.

I know the background it still terrible - I have some new exciting things coming soon so I hope this will improve.

But thank you all for the support while I learn.

So this weeks video is a tutorial for a needle felted penguin

This is such a fun project to make using some really basic tequniques. All you need to be able to do before you start is to practise needle felting a ball - and I have a video for that


So once you have got the hang of that then you are ready to try your first ever project. 
Here is part one, this teaches you how to link two balls together, adding more fleece to smooth out the transition from body to head, hot to flatten the bottom of the body to alow the peice to stand up and how to start adding a different colour.


And part two continues adding different colours, using small balls to make beaks and eyes and giving ideas for how to add wings or be inspired with different types of penguins 
(and yes, I messed up in the video, the one I was holding was a rockhopper penguin) 

I really hope you all enjoy this, I am loving all the support and I know my videos can only get better with your help :) 

If you do make a penguin feel free to share, I would love to see them, and any questions or feedback please get in touch

I also have some great ideas for tips and tricks for growing your Etsy store so please keep an eye out 


Thursday, 12 January 2017

Needle felting tutorials, How to Make wool curls

A new video for all you felters

Today it involves no needle felting at all - but shows you how to make these fun fleece curls


These are SO easy, they take a day or so but you can make them in any colour you wish


I hope you like
Please keep a eye out as I have a whole load of these videos planned, if there is anything you would like to learn about needle felting then please ask below


Thursday, 5 January 2017

First steps in needle felting

So back in the mists of time (2 years ago) I had the fantastic idea to create some beginner needle felting videos.

I filmed a few and even managed to edit some, like this introduction to needle felting


And this first exercise - felting a ball 


And then my computer decided it didnt want to talk to my video editing software.

Now - Two years later I finally have editing software I can use - so Im working through the videos I had already made (know whats worse than seeing yourself on film? Seeing yourself 2 years ago on film and not being able to change what you are saying!) 

Here is the first of the recorded ages ago new videos


I plan to continue uploading the remaining tutorial videos from the past and I have a load of new ideas for new videos (which I promise will have way better audio!!) So please feel free to like and share and subscribe either here or on my YouTube channel.


Monday, 21 July 2014

An introduction to needle felting

So to practise for a possible online TV show (nothing written in stone, dont get too excited) I decided to make a series of needle felting tutorials. Here is the first one, an introduction to the equipment needed to needle felt
I hope you all like it, if you are interested in trying felting I also included some links to some of the shops I use for my felting supplies

http://www.winghamwoolwork.co.uk/
www.mohairbearmakingsupplies.co.uk
http://www.worldofwool.co.uk/
http://www.glasseyesonline.com/

and of course please have a look at my Etsy Shop if you are interested in your own felted sculpture or my bookmark tutorial

Monday, 24 March 2014

How I built my Centaur


 I thought some of you might like to see some stages in one of my latest sculptures

The Centaur

I started building a base out of pipe cleaner then creating the shape of the horses body and a start of the mans torso in core wool


 Making a face worried me as I havent really done many human(ish) faces before so I decided to work on this next. I gave him blue glass eyes

Then I worked on his torso
If Im making a man I might as well have a man with a 6 pack :) it was fun trying to figure how muscles would work on a body like this


 Hands were freaking me out so I chickend out and added the colour to his body and spent a very long time making sure he was very firmly felted and balanced on his 3 hooves (it was tough to get him to stand up well)
Finally I built up the guts to try the hands - the scale is so tiny and I wanted his hands to look realistic with 4 fingers and a thumb on each hand

I am quite happy with how they worked out - I came up with a cheety method, I will make a tutorial of that soon


I then worked on his rustic wooden spear and added his hair


The hair looked very wrong to me so adding a little grey brought him more to life (and people say he looks a little like Billy Connely now)


Then a little tidying up and my project that has taken the longest time to date was ready for his photoshoot

I am quite happy how he turned out - not 100% happy, I never am :) but he is similar to the guy I saw in my mind before I started

He is up for sale in my needle felting shop

Wednesday, 20 February 2013

New from Etsy, Automatic PDF download

I am quite excited, I have been invited to a new team on Etsy, the digital team, and as a member of this team it means I can get to trial their new feature
Automatic PDF downloads
This now means if someone buys one of my pdf needle felting tutorials as soon as they have paid they can automatically download their purchase instead of having to wait for me to do it manually

and it seems to be really popular - I made my first sale that way just moments after going live

Hop on over and have a look at my Splat tutorial 


Or my Kokeshi type doll tutorial
Each kit is under £3 and has over 10 pages of full colour images and step by step instructions to make your project.
They are both suitable for beginners using basic shapes and building up from there. They take up to around 3 hours to make and the equipment needed (fleece, needle, felt and optional foam pad) can be picked up online for just a few pounds

Monday, 2 July 2012

Speed felting

Would you like to see how I made this little guy??
Not a tutorial but a speed video
I filmed about 4 hours of me making this guy then I have speeded it up into a 10 min film.
Hopefully it will be interesting and helpfull to some people - I loved watching the eyebrows and eyes take shape in high speed
Hope you all like it, it was fun to make - if we get a sunny enough day again I might make another one

Saturday, 27 February 2010

Needle felting, beagle, stage 10


To attach the head to the body I take a large piece of fluffed up fleece and felt it into the back of the head


I then hold the head above the body in the position I would like it to end up in and I spend a long time firming up the neck, stabbing lots up into the head and down into the body to bring fibers through each and meshing the two pieces together firmly.


Keep stepping back and looking at the piece and adding more fleece to areas that are too skinny. At this stage you can pose the head a little, often it gets a little more life if you cock it to the side a little.
Spend LOTS of time felting the body now so it is very firm and smooth

Friday, 26 February 2010

Needle felting, beagle, stage 9

Now the body is quite smooth and firm I bend the legs over into a more dog like shape

First just bending them over but then curving the back legs out slightly and back in again at the hock joint.


Now looking at how a real dog is build I add more fleece to pad it out. I fluff up the fleece between my fingers to it dosent show lines as it felts then I add some to the hips and chest, I also fatten up the body of the dog. Keep adding and felting until the dog is firm and dog shaped. At this point I am realising the front legs are a little short but I will deal with this later

Wednesday, 24 February 2010

Needle felting, beagle, stage 8


With the wolf I didnt use a frame to make the body but often I use a frame to allow gentle posing and to help keep the size somewhere sensible (I tend to make them bigger and bigger)


I cut two lengths of pipe cleaner and fold in the ends (so there are no sharp bits of wire) I then fold them into a rough body shape and twist the middle together.
Starting with the legs I wind wool around the frame. It is important to felt lots here in lots of directions to smooth out the areas where the wool was wrapped


Also the firmer this base is the easier the next bits are to felt.
Keep felting until the fleece is smooth and firm, this should take well over an hour

Friday, 19 February 2010

Needle felting, beagle, stage 5

The lips really help to give the dog expression and life

To make these I tease out a few strands of fleece twisting them to make a cord like a thin peice of yarn - the thicker it is the easier it is to felt but of course too thick will look too clunky


Then I take the center of the cord and felt it in below the dogs nose

Felting one side at a time I make an upside down V from the nose to the mouth felting the cord to the nose.

I then take the cord from the front of the mouth all the way to the back corner in a U shape


This helps define the dogs smile, it takes tiny delecate stabs with the needle to secure without burying the cord.
I then felt along the bottom lip to meet the ends of the cord in the middle of the bottom lip

Thursday, 18 February 2010

Needle felting, beagle, stage 4


To make the nose I use a small piece of black fleece.
First I roll it into a ball and then between my fingers I pinch a edge out slightly


Carefully holding this I gently stab into a kind of rounded triangle shape. At this point I have to be very careful to make sure I let the needle slide between my fingers rather than stab into my flesh (owwwch)


I do not firmly felt the nose at this point because I prefer to sculpt it into shape on the actual sculpture
Felt all around the nose onto the head shape being careful to angle the needle in towards the centre of the head, if the needle pokes out of the white fleece at this point it will have taken some of the black fleece with it and this will cause a tiny black spot to appear in the white fleece


Stabbing many times into each side not only forms nostrils in the nose but also makes sure it is well attached onto the head


Wednesday, 17 February 2010

Needle felting, beagle, stage 3

Now the head is fairly firm and in an almost doggy shape I start colouring it in.
The Beagle I am aiming for has reddish brown markings with a black cap so I apply fleece in the areas I want to colour and I firmly felt it in place
Stabbing many times in the same place creates dents in the fleece that gives me an idea where I would like the eyes to be. For felted eyes this is useful to stop the felt stick out too much. If you are using glass eyes this gives a nice eye socket for the eyes.
At this stage have another good look at your dog. I decided that he needed eyebrows above the eyes so I added a small amount of fleece above each eye socket to give a more realistic expression

LinkWithin

Related Posts with Thumbnails